ROVE R2-4K FAQ
ROVE R2-4K is a plug and play device and ready to record by default settings right out of the box. Setting it up is just quick and easy.
To install the camera all you have to do is: 1. Insert the memory card in the camera and then format it before first-time use. 2. Now slide the suction mount on the mounting assembly on top of the camera. 3. Now plug in the USB cable to the camera and simply press the suction mount on your windshield and while pressing the suction mount, turn the locking knob of suction mount form unlock position to the lock position. This will make the camera mounted on your car's windshield. Then the last step is to connect the 12V cigarette power port to your cigarette lighter. That's it, the camera is now all set and ready to go.
TO INSERT: Make sure the camera is turned OFF first. Then align the GOLD contacts facing towards the front of the camera (Lens Side). Then insert the memory card halfway in. Use your FINGERNAIL or PAPERCLIP to push the card all the way in until it clicks and locks in place.
TO REMOVE: To remove the MicroSD card, gently push its edge inward until it clicks, and then pops out, then simply pull it out the slot.
"We highly recommend formatting memory card first before first-time use.
Please format it by going into the camera's System settings.This is just quick and easy. To do this, please try the following. 1. Press OK to stop video recording first. 2. Press M button to go to Video Settings. 3. Press M button again to go to System Settings. 4. Press the DOWN button to scroll down until you see FORMAT. 5. Press OK to enter Format submenu. 6. Then Press DOWN to highlight FORMAT. 7. Press OK button to Format the memory card. Please check out this video on how to format the memory card. https://youtu.be/C42xL-bsSks.
Unfortunately, NO. It can NOT be used to live stream the video feed via IP to another side of the device. It is NOT an IP camera. The camera's built-in WiFi feature is ONLY to pair your dash cam with your smartphone.
Please format it by going into the camera's System settings.
You can live stream video from the dash cam via WiFi paring to your smartphone, but you have to be within 10 FT from the camera with no obstruction in the middle. So as soon as you go out of 10FT range, you will NOT see any live feed. Like other dash cams, this is how ROVE R2-4K WiFi feature work.
YES, it can be hardwired. If you are into a hardwiring setup, you can purchase any hardwire kit with battery voltage meter protection and a MINI-USB connection.
We recommend using our own ROVE Ultimate 3-lead Hardwire kit to utilize the 24HR Auto Trigger Parking Mode feature of the camera.
Here is the link for our ROVE Ultimate 3-lead Hardwire kit: https://www.rovedashcam.com/products/rove-ultimate-3-lead-mini-usb-hard-wire-kit-for-dash-cam
YES, it sure can.
ROVE R2-4K has a Speed Stamp feature so the speed will show up on your video at the bottom when you view it later as a proof of how fast you were driving. It will always be stamped on the video as long as the STAMPS feature is ON.
If the password is not working, then you can do two things.
1. Please check the current WiFi password of your camera by checking the camera's LCD. The WiFi password is shown on the LCD when you turn on the WiFi. It will be shown after PWA2: ********
2. If the password has been changed, then please go to system settings and set the camera to default settings, which will make the WiFi password back to 12345678.
After you do this, you will need to make the ROVE WiFi forget on your smartphone and then start all over again. Otherwise, you will not be able to connect the WiFi.The Serial Number is located at the bottom part of the camera or at the actual box where it came from. So Serial numbers can be seen; 1) At the bottom part of the camera 
2) Box

ROVE R2-4K has a built-in microphone to record audio with video. You can choose to record either MUTE/UNMUTE video by going to the camera Video Settings > Record Audio > Choose ON/OFF.
SHORTCUT: You can also press the UP button to MUTE/UNMUTE while the video is being recorded.
With the current firmware, the camera has no menu to ZOOM in/out the image details. Having said that, we are already working on adding this menu on the next firmware update.
In the meantime, we have TWO ways to do this. 1. ZOOM IN ON YOUR SMARTPHONE: You can view your recorded video files by utilizing the ROVE App on your Android/iPhone. You can download that video to the ROVE App first and then use the SHARE button to save that video to your iPhone/Android's photo album. You can play that video directly from your phone and can easily zoom in and view the details that you need.
2. ZOOM IN ON YOUR PC: - Connect the camera directly to your PC by using the SHORT USB data cable and select ""Connect as USB Flash Drive"". You can use either the GPS Player then pause the frame and use the camera button to take a snapshot and then you can zoom in on the saved photo. - You can also utilize the VLC media player and zoom in on the video by using the features of the VLC media player. You can download the VLC media player free at www.videolan.org
"As far as time setting is concerned, that is an easy fix. All you have to do is set the correct time zone setting instead of the actual date and time.
To ALWAYS have correct DATE & TIME, Please do NOT set the date and time manually from the camera's system settings. Instead, all you have to do is set the correct GMT Value based on your location under the TIME ZONE SETTING by going into the camera's system settings. You can find your correct GMT Value by visiting this link. https://greenwichmeantime.com/time-zone/usa/
Once you set your correct GMT Value under time zone setting, you will always have the correct date and time whenever you have a GPS signal lock.
Please NOTE that you may not get the correct date and time right away if you are trying this inside your home. Because you will NOT get a GPS signal inside your home. So please wait until you go to your car and until you get a GPS signal. Once you get a GPS signal, you will always have the correct date and time every time.
Here are the Box Contents.
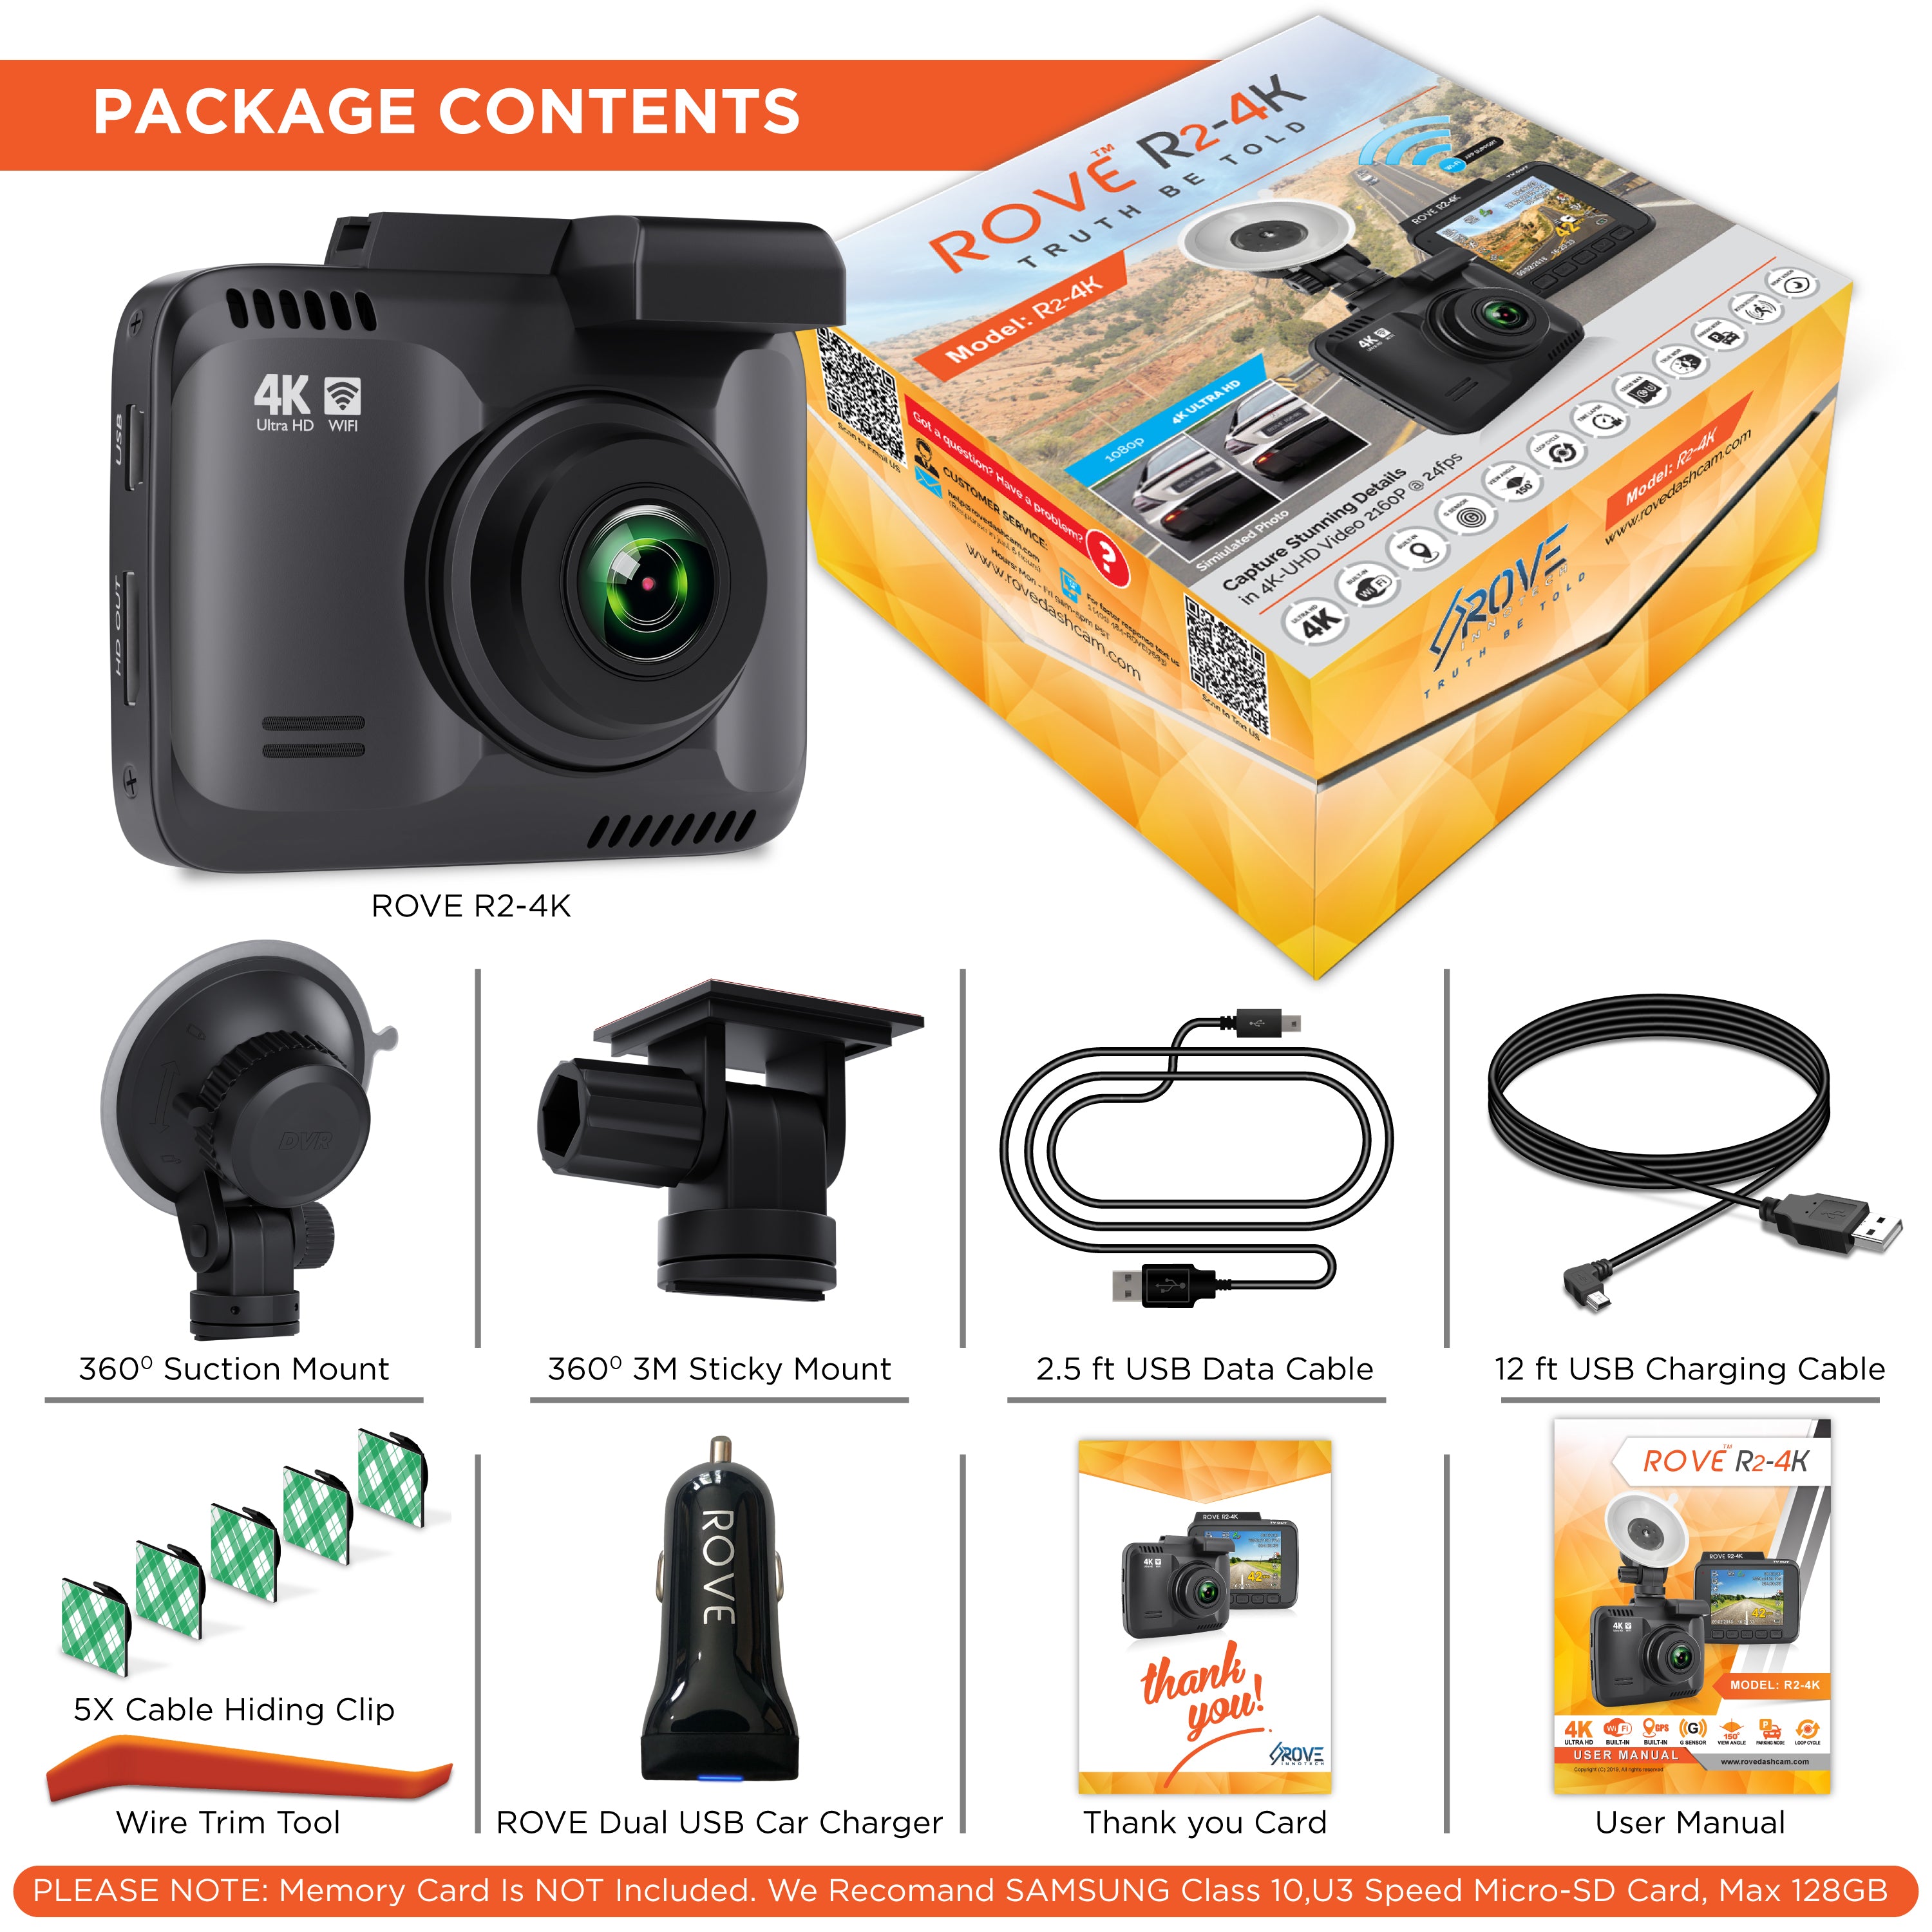
- ROVE R2-4K Camera - ROVE Dual USB Car Charger - 360° Suction Mount - 360° 3M Sticky Mount - 12ft USB Power Cord for Car - 2.5ft USB Data Cable - Wire Trim Tool with 5x Cable hiding clips - User Manual - Thank you/Warranty Card - 1-Year Limited Warranty & Personalised ROVE R2-4K 11082018 Firmware. (We also provide a firmware upgrade for FREE) Please NOTE: The memory card is NOT included. We recommend SAMSUNG CLASS 10, U3 SPEED MICRO-SD CARD.
Unfortunately, NO. The memory card is NOT included on the package. You need to purchase it separately.
This is the one SPECIFIC card that we recommend for its quality, durability and faster read and write speed required for 4K video recording

We recommend this card and you can get it here from Amazon.
See HereROVE R2-4k dash cam is only a SINGLE channel camera so it does NOT have the capability to do dual type of recording. (Front and Back)
Many of our customers love purchasing two of the ROVE R2-4K dash cameras because this will give you same 4K video front and back. You just have to provide power to the rear camera and you are all set.
Because when you purchase a dual camera, the rear camera resolution is lower such as only VGA or 720P and not a good night vision because you are running two cameras with a single processor and only with a 4MP sensor with a 2MP sensor for the rear only. Which will NOT give you a good image quality?
Many of our customers end up purchasing two of the ROVE camera, one for front and one for the back, that why you have full 4K resolution and amazing night vision front and rear for almost the same price. Hope this makes sense.
Some good dual cameras are also 1080P front and 1080P rear, but they are about $200 and the resolution is still not as close to what ROVE R2-4K has to offer.
So with ROVE, you can get two cameras for about the same price and that way you have upscaled camera with ultra HD video resolution front and rear.
ROVE R2-4K has an internal battery which is very small and is only meant to last 3-5 minutes only when it is fully charged. It is NOT meant to last more than 3-5 minutes on purpose. NO matter which brand of dash cam you will buy, their internal battery will be no different.
Why is the internal battery is NOT meant to last more than 3-5 min in-dash cameras? All the dash cameras are designed this way due to fire safety. If we place a larger battery into the camera such as our smartphones, then during the summer days the temperature inside the car can exceed the limit which can cause the battery to explode and can cause a fire. Therefore due to the fire safety, we can't place larger batteries in the dash cameras.
Why do some dash cameras have an internal battery? - The internal battery is only there to support a few small functions such as to provide enough power to save the last video file when the power gets disconnected.
- PARKING MODE: Parking mode lets you record 1-min video on an internal battery, if someone hits your car when you are not in your car, then if the impact triggers parking mode, then the camera will turn ON and start recording for 1-min on an internal battery, then it will SAVE & LOCK that video, then the cameras turns itself OFF automatically. (Remember, Parking Mode lets you record a 1-min video every time, and your internal battery can provide power up to 5-minutes when fully charged. So, up to 5-cycles of parking modes, however, let's hope that no one will hit your car more than once in a day... 😀)
Another thing to keep in mind that the higher the resolution you choose the more power it will consume hence it will last a short amount of time. The same way if you choose the lower resolution, such as 1080P @ 30fps, then the camera should last about 4-5 min when fully charged (Most likely longer than 5-minutes, as some customers have reported up to 8 or 9 minutes)
Therefore the dash camera should always be plugged into the power all the time for its operation.
If your memory card becomes FULL and the camera STOPS recording then that means you may have set the Loop Cycle recording to 4GB Max option which means the loop cycle is OFF.
This is an easy fix. All you have to do is format the memory card by going into the camera’s system settings & then make sure to set your loop cycle recording feature to either 1, 3, 5 or 10-min. Which means the loop cycle is ON.
Please also make sure to backup important videos before formatting your memory card.
WHAT IS LOOP CYCLE FEATURE AND HOW DOES IT WORK? This feature allows for your camera to delete the oldest video files first automatically so the newest video files can be written over and over again automatically in a seamless loop way without you needing to delete the videos manually.
4GB MAX = LOOP CYCLE is OFF - When you set this option, the camera will record one big file up to 4GB in size maximum depending upon the video resolution you choose. - And the camera will continue to record the new videos until your memory card becomes full. When the memory card becomes full, the camera will give you a message ""CARD FULL"" and it will STOP recording further until you either delete the videos or format the card manually to make more room for the new videos again.
Therefore, if you don't want this to happen then, 1, 3, 5 or 10-min = LOOP CYCLE is ON - Set the LOOP Cycle function to either 1, 3, 5 or 10-min so the camera can delete the oldest files automatically so it can write new videos over and over again without you needing to delete the videos manually. - Your video files will be split into the selected video length accordingly. (i.e. If you set the loop cycle to 1-min, then all your video files will be 1-min each)
If the camera freeze up and NO buttons are responding, then please press the RESET button at the bottom of the camera ONCE with either paper clip or the tip of the pen and this will restart the camera. In the meanwhile, it is possible that it is a MEMORY CARD issue (NOT a camera issue) - Please Contact US.
Unfortunately, NO. You need to purchase the hardwire kit separately.
If you are into a hardwiring setup, you can purchase any hardwire kit with battery voltage meter protection and a MINI-USB connection.
We recommend using our own ROVE Ultimate 3-lead Hardwire kit to utilize the 24HR Auto Trigger Parking Mode feature of the camera. Here is the link for our ROVE Ultimate 3-lead Hardwire kit:BUY NOW
YES, it sure can.
You can take a screenshot by pressing the power button while video is being recorded.
You can also switch to PHOTO Mode and take still photo up to 12MP each.
Unfortunately, NO.
We only sell single channel ROVE R2-4k dash cam.
Many of our customers love purchasing two of the ROVE R2-4K dash cameras because this will give you same 4K video front and back. You just have to provide power to the rear camera and you are all set.
Because when you purchase a dual camera, the rear camera resolution is lower such as only VGA or 720P and not a good night vision because you are running two cameras with a single processor and only with a 4MP sensor with a 2MP sensor for the rear only. Which will NOT give you a good image quality?
Many of our customers end up purchasing two of the ROVE camera, one for front and one for the back, that why you have full 4K resolution and amazing night vision front and rear for almost the same price. Hope this makes sense.
Some good dual cameras are also 1080P front and 1080P rear, but they are about $200 and the resolution is still not as close to what ROVE R2-4K has to offer. So with ROVE, you can get two cameras for about the same price and that way you have upscaled camera with ultra HD video resolution front and rear.
ROVE R2-4K is designed to turn ON and START recording automatically as soon as it receives power, then save that last video file, and then automatically STOPS recording and turns itself OFF when power gets disconnected. An example of this is when you START/STOP your car.
YES, with the new firmware, it has a new feature called Rotate Video. This feature allows you to flip your video 180 degrees to have the correct side of the image still when the camera is mounted upside-down.
You can see this option by going to the Video Settings.
Here is the one that can be used with ROVE R2-4K dash cam:
https://www.amazon.com/Dash-Cam-Mirror-Mount-KDLINKS/dp/B0102CK1BS/ref=lp_12669272011_1_1?srs=12669272011&ie=UTF8&qid=1523253396&sr=8-1 NOTE: You will need to do some assembly to make it work. The steps are provided on the item’s listing on Amazon.
At ROVE we provide ONE (1) full year of limited warranty for your product from the date of purchase to be free from defects in materials and craftsmanship from the date of purchase.
You can purchase a 1-year extended warranty from us for only $19.99, which gives you a total of two years of warranty from your purchase along with some VIP benefits. We recommend this to anyone. By investing just $19.99, you will get $40 OFF coupon code for our future upgrade after 6-months. Check out the extended warranty details here.
https://www.rovedashcam.com/pages/warranty
As far as WiFi is concerned, we really do NOT advise to change the Wifi password/ Wifi name because as soon you turn on the wifi from your camera, your WiFi password should automatically appear on your screen so it really doesn't matter what password you choose.
However, if you still prefer to change the Wifi password, here are the steps for it. 1. Make sure to ONLY use English letters and numbers only. Do NOT use special characters and letter and numbers to NOT exceed more than 8 total. 2. After you change the password, turn OFF the wifi from the camera. 3. Then, completely close the ROVE App from your Android/iPhone. 4. Turn ON the wifi from the dash cam. 5. Then, go to SETTINGS > WIFI on your smartphone > Look for ROVE R2-4K Wifi > Make the WIFI FORGET from your smartphone. Now turn OFF the wifi and turn it back ON again from the dash cam. 6. Now, reconnect the ROVE R2-4K wifi and your smartphone should ask you for the new password that you changed. (The new password is shown on the LCD of the camera.) 7. Now you can use the new password to make the connection between your dash cam and your smartphone. 8. Once the wifi is connected, simply open the ROVE App and it should work fine.
If you try to change the password to anything but 8 characters and numbers then the camera will freeze up. This a known issue to us and we are remaking our ROVE App for better user experience and it's coming out soon.
If your memory card becomes FULL and the camera STOPS recording then that means you may have set the Loop Cycle recording to 4GB Max option which means the loop cycle is OFF.
This is an easy fix. All you have to do is format the memory card by going into the camera’s system settings & then make sure to set your loop cycle recording feature to either 1, 3, 5 or 10-min. Which means the loop cycle is ON.
Please also make sure to backup important videos before formatting your memory card. WHAT IS LOOP CYCLE FEATURE AND HOW DOES IT WORK? This feature allows for your camera to delete the oldest video files first automatically so the newest video files can be written over and over again automatically in a seamless loop way without you needing to delete the videos manually.
4GB MAX = LOOP CYCLE is OFF - When you set this option, the camera will record one big file up to 4GB in size maximum depending upon the video resolution you choose. - And the camera will continue to record the new videos until your memory card becomes full. When the memory card becomes full, the camera will give you a message """"CARD FULL"""" and it will STOP recording further until you either delete the videos or format the card manually to make more room for the new videos again.
Therefore, if you don't want this to happen then, 1, 3, 5 or 10-min = LOOP CYCLE is ON - Set the LOOP Cycle function to either 1, 3, 5 or 10-min so the camera can delete the oldest files automatically so it can write new videos over and over again without you needing to delete the videos manually. - Your video files will be split into the selected video length accordingly. (i.e. If you set the loop cycle to 1-min, then all your video files will be 1-min each)
ROVE R2-4K has LCD ON/OFF Setting feature. This feature allows you to select the time duration for the camera's screen to be turned OFF after the camera started. It was developed to make it a less distraction when driving especially during night time.
How to turn ON/OFF this feature? MANUAL WAY: You can just easily PRESS the DOWN button ONCE to turn ON/OFF the LCD screen while in video mode anytime or while the video is being recorded.
AUTOMATICALLY: If you prefer your camera's LCD screen to go blank when there are no buttons are pressed for 1-minute, then you can set it up by going to the System Settings>Scroll DOWN until you see the Screensaver Setting> Press the OK button to enter the sub menu> Select LCD OFF After 1-Min. (NOTE: Only the LCD screen will be turned OFF, the camera is still operational)
ROVE R2-4K has LCD ON/OFF Setting feature. This feature allows you to select the time duration for the camera's screen to be turned OFF after the camera started. It was developed to make it a less distraction when driving especially during night time.
How to turn ON/OFF this feature? MANUAL WAY: You can just easily PRESS the DOWN button ONCE to turn ON/OFF the LCD screen while in video mode anytime or while the video is being recorded.
AUTOMATICALLY: If you prefer your camera's LCD screen to go blank when there are no buttons are pressed for 1-minute, then you can set it up by going to the System Settings>Scroll DOWN until you see the Screensaver Setting> Press the OK button to enter the sub menu> Select LCD OFF After 1-Min. (NOTE: Only the LCD screen will be turned OFF, the camera is still operational)
We apologize that we don't have this part specifically drawn up. Soon, we will make this happen in our user manual. We always take a good opportunity to improve our instruction manual and products.
In the meantime, below are the details on how much time is stored on the memory card in the loop feature: For 32GB Memory Card - 4K 2880x 2160 @ 24fps: 2hr 40min - Full HD 1920x1080 @ 60fps: 3hr 13min - 1280x720 @ 120fps: 3hr 13min
For 64GB Memory Card - 4K 2880x 2160 @ 24fps: 5hr 20min - Full HD 1920x1080 @ 60fps: 6hr 27min - 1280x720 @ 120fps: 6hr 27min
For 128GB Memory Card - 4K 2880x 2160 @ 24fps: 10hr 40min - Full HD 1920x1080 @ 60fps: 12hr 54min - 1280x720 @ 120fps: 12hr 54min
For 256GB Memory Card - 4K 2880x 2160 @ 24fps: 22hr 20min - Full HD 1920x1080 @ 60fps: 25hr 48min - 1280x720 @ 120fps: 25hr 48min
For 512GB Memory Card - 4K 2880x 2160 @ 24fps: 44hr 40min - Full HD 1920x1080 @ 60fps: 51hr 16min - 1280x720 @ 120fps: 51hr 16min
These are approximate but close, give or take a few mins depending on the memory card. The lower the resolution, the more it will hold, and the higher the resolution the less it will hold.
A polarizer filter is required to remove glares from videos.
You can purchase a CPL (Circular Polarizing Filter), and apply in front of the lens to get rid of the reflection from the dashboard.
We don't have exact size CPL for ROVE R2-4K, however, if you can be little handy, you can use this one. Many of our customers have used this and they love it.
Please see this youtube video. https://youtu.be/O71yymGIhu4 Link of the CPL Filter that we recommend: https://www.amazon.ca/Freewell-PL-Camera-Phantom-Advance/dp/B072B934ML
Due to the lens and GPS, the camera's mount will not work properly for an almost flat windshield (verticle). It needs at least a 20° slope/angle for it to mount properly.
To remedy this, you can do one of the few things: 1. Mount the camera on the dashboard upside-down -- with the current camera's software, there is a new feature under the Video Settings called Rotate video. This feature allows you to flip your video 180 degrees to have the correct side of the image still when the camera is mounted upside-down.
2. Few of our customers are using this universal mount from Amazon for their RV truck with an almost flat windshield. Here is the link:
https://www.amazon.com/dp/B07K2CSD1D/ref=sspa_dk_detail_0?psc=1&pd_rd_i=B07K2CSD1D
YES, sure you can. ROVE R2-4K comes with a 360-degree rotational mount (suction and sticky), so you can easily turn your camera 360 degrees OR at your preferred angle position if you need to record video at your side window or inside your vehicle.
YES, you sure can delete only the lock videos or single video.
You can do so by three different ways. (1) FROM CAMERA DIRECTLY. a. First, you need to unlock the locked video before deleting it. b. Go to the PLAYBACK Mode by pressing and holding the Menu button for 2-3 seconds twice and scroll each video. c. When you see the locked video you would like to delete, press the OK button to select it and press the Menu button to go to the Playback Settings. (the locked video has a key icon on it) d. Go to Protect setting and select "Unlock Current", and then go to Delete and select "Delete Current" to remove the specific video.
(2) USING YOUR iPhone or Android phone. Connect the camera to your smartphone via Wi-Fi feature and use the ROVE App to delete specific video/s.
(3) USING YOUR PC/MAC Insert your camera’s micro-SD card into the PC/MAC. Your locked videos are saved under the RO folder or Read-Only. Select the locked video you want to delete and press the Delete button on your keyboard or right-click the file and select “Delete.”
The new ROVE R2-4K can now support up to 512GB MAX size of memory card. We recommend Samsung Class 10, a U3 speed memory card for its quality, durability, and faster read and write speed for 4K video recordings. Almost all our customers use this card and they never complained about it. We also suggest that you please purchase it from your local store like Best Buy, Staples, Office Depot, etc., that way you will always have a genuinely branded memory card. If you purchase one from Amazon, then it must be shipped and sold by Amazon LLC. Here's the card we recommend. Search for ASIN: B0887GP791
YES, you sure can. To change the speed unit to KM, please go to the Video Settings > Scroll down until you see Speed Unit option and select your preferred speed unit.
The ROVE R2-4K dash cam has 2 parking features. They are the Classic Parking Mode and the 24-HR Auto Trigger Parking Mode. These features are two different features. They also act and work differently based on different needs.
Classic Parking Mode: This feature allows your camera to record 1-min video on an internal battery if someone hits your vehicle when it is parked or when it is unattended, then if the impact triggers the G-Sensor, then the camera will turn ON and start recording for 1-min on an internal battery, then it will SAVE & LOCK that video, then the camera turns itself OFF automatically. Now when you turn ON your vehicle again the camera will give you voice alert stating Parking Mode got activated while you were away. The locked video will be saved under the RO or Read-Only folder. You can check the saved and locked video either on the camera's Playback Mode, on your smartphone, or directly to your PC/MAC.
24-HR Auto Trigger Parking Mode: PLEASE NOTE: ROVE’s custom-designed 3-Lead Hardwire Kit is required to use this new feature. You can purchase separately through this link: https://www.rovedashcam.com/products/rove-ultimate-3-lead-mini-usb-hard-wire-kit-for-dash-cam
OPTIONS: - OFF - Time-Lapse 1fps & G-Sensor - Motion Detection & G-Sensor We have custom designed this feature as many of our valued customers have requested. They have always asked us why you can’t design the parking mode or motion detection that can go into parking mode automatically. We are thrilled to inform you that we have developed this feature even better than you have requested. Thank you for your support and suggestions.
Time-Lapse 1fps & G-Sensor: (See how this feature works) 1. When this feature is set to ON and ROVE’s 3-Lead Hardwire Kit is installed properly. 2. Then, when you turn OFF the car’s engine and turn the key to the lock position. 3. Then the camera will STOP the continuous video recording and it will go into the time lapse 1fps recording mode automatically. 4. Now while this time-lapse is being recorded, If someone hits your car and if the impact reaches the set G-Sensor level, then the camera will stop the time lapse video > then it will start to record 1-min continuous video, save & lock that video in RO folder > then return to recording the time lapse 1fps. (When the Parking Mode got activated, the camera will give you voice alert stating “Parking Mode got activated while you were away” when you turn ON your car the next time. If you hear this, you should check the locked videos to see what happened.) 5. Now when you start your car for the next time, the camera will automatically STOP the time lapse 1fps & G-Sensor parking mode. Then it will go into normal video mode automatically to start the continuous video recording.
Motion Detection & G-Sensor: (See how this feature works) 1. When this feature is set to ON and ROVE’s 3-Lead Hardwire Kit is installed properly. 2. Then, when you turn OFF the car’s engine and turn the key to the lock position. 3. Then the camera will STOP the continuous video recording and it will go into the motion detection mode and the camera will stay ON and idle, but LCD will be off after some seconds. 4. Now the camera will only record video when it detects motion in front of the FOV of the camera and then it will record until there is no more motion is detected. 5. Now while the camera stays in Motion Detection mode, if someone hits your car and if the impact reaches the set G-Sensor level, then the camera will stop the motion detection mode > then it will start to record 1-min continuous video, save & lock that video in RO folder > then return back to the motion detection mode. (When the Parking Mode got activated, the camera will give you voice alert stating “Parking Mode got activated while you were away” when you turn ON your car the next time. If you hear this, you should check the locked videos to see what happened.) 6. Now when you start your car for the next time, the camera will automatically STOP the motion detection & G-Sensor parking mode, and it will go back into normal video mode automatically to start the continuous video recording.
YES, you can set your preferred hour format by going to the camera’s System Settings. Also, to always have the correct time and date, we strongly suggest that you set the correct GMT value under the Time zone Settings.
https://www.rovedashcam.com/